Many Android apps use web (HTTP) requests to communicate with their servers. This guide will help you set up a proxy and view web traffic between your Android device and the internet.
an Android device (root access optional, but recommended),
a computer (with Linux, macOS or Windows - other operating systems might work, but might require additional steps),
a USB cable to connect your mobile device to the computer,
access to a network (eg. via Wi-Fi) that you can connect to with the computer and the mobile device.
Set up a proxy
First, we will install and setup mitmproxy, a proxy that will intercept web requests going between the Android device and the internet.
Go to https://mitmproxy.org on your computer, and download mitmproxy for your operating system.
Run the mitmweb executable. The mitmproxy web interface should open in your default browser. If you need to open it manually, go to http://localhost:8081. File:Mitmproxy web interface.pngThe mitmproxy web interface.
Note the IP address of your computer on the network.
Linux: In a terminal, run ip a. This will list your network interfaces. Look for those with names starting with enp and wlp, they are your wired and Wi-Fi interfaces. Within those, look for a line starting with inet, which is followed by the IP address and mask, separated by a slash. The mask is not needed here. File:Ip a command output.pngip a output. There are three interfaces, lo, enp4s0 and virbr0. enp4s0 is the wired interface. The IP address is highlighted.
macOS: In a terminal, run ifconfig. This will list your network interfaces.
Windows: In a terminal, run ipconfig. This will list your network interfaces.
Note: You might need to change firewall settings for the proxy to be accessible on the network.
Set up proxy settings on the mobile device
In this example, we set the host name to 192.168.3.57, and the port to 8888 - the same values as shown in the terminal output above.
To make web traffic from the device go through the proxy server, you have to change its proxy settings.
Note: Due to differences between different Android vendors, these steps might slightly differ.
On your Android device, go to Settings → Network & internet → Wi-Fi and select your Wi-Fi network.
Tap the pencil icon to edit the connection, then in Advanced options, change Proxy to Manual.
Set Proxy hostname to the IP address of your computer, and Proxy port to 8080, which is what mitmproxy uses by default.
Save the settings. You might need to disconnect from the network and connect to it again.
The proxy is now set up. However, if you try to access a website on your Android device, you might notice that it's either marked as insecure or doesn't work at all. This is because most websites and software nowadays are secured using the HTTPS protocol, which prevents bad actors from doing what we are trying to do - intercepting your web traffic.
HTTPS utilizes certificates, which allow clients to verify the identity of servers. When mitmproxy intercepts traffic, it uses it's own certificate, which is (rightfully) not trusted by your Android device, thus the identity verification fails, and an error is reported.
Install the certificate on the mobile device
To intercept HTTPS requests, you need to install the mitmproxy certificate on your Android device.
The steps depend on whether or not you have root access. If you have root access, you can install the certificate to the system store, which allows intercepting encrypted traffic right away. If you do not have root access, you will need to install the certificate to the user store, which usually requires modifying the app to work, with the process having to be repeated for each app you want to monitor and every time you want to update.
Installing to the system store (root access)
Installing to the user store (no root access)
On your Android device, go to http://mitm.it while connected to the proxy. This website is hosted by mitmproxy, and allows you to download its certificate. Scroll down to Android and tap on Get mitmproxy-ca-cert.cer to download the file.
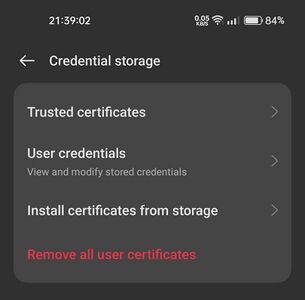
Go to Settings and search for options about certificates. On my device, it is under Settings > Password & security > System security > Credential storage. From here, you should be able to view, add, and remove certificates installed on the system. Here, you can view, install and remove certificates from your device.
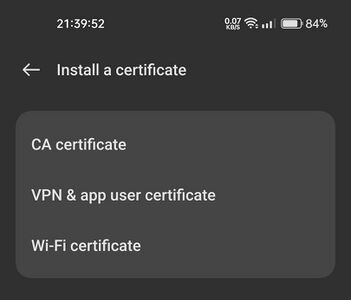
Select Install certificates from storage, and then CA certificate. Choose the "CA certificate" option on this screen.
A pop-up may show up, warning you of the safety concerns related to adding custom certificates. Read it, and if you are sure you want to do this, tap on Install anyway. Remember! After you are done exploring network traffic from an app, you can remove the certificate by going into this settings menu, selecting Trusted certificates, switching to the User tab, selecting the certificate and tapping on Uninstall.
You may be asked to verify your identity. After confirming your identity, you will be asked to choose a file. Select the file you downloaded before - it should be named downloadfile.crt and it should be located in your Downloads folder. Choose the downloaded certificate file (usually called downloadfile.crt)
After selecting the file, the certificate should be installed. You can verify that, by going into the Trusted certificates menu, and selecting the User tab - your certificate should be there. You can tap on it to view detailed information about the certificate or uninstall it if you don't need it anymore.
The certificate was installed successfully.
The certificate should now be installed properly on the mobile device, however we still will not be able to see HTTPS traffic in Charles.
Now, the YouTube app does not load.
If you now try to open an application on your mobile device, you will see that it will not be able to connect to the servers. This is because all traffic is now captured by Charles. Most apps do not accept user-installed certificates as valid, which means even though our certificate is installed, the applications are acting as if it is an unknown certificate, and therefore cannot connect to the server at all.
Get APK files of the application that we will modify
We will modify the application slightly so that it will accept user-installed certificates. In this guide, we will be using Rizline as an example.
To decompile and build Android applications, we will use Apktool. To download and install Apktool, follow the instructions on this page: https://apktool.org/docs/install.
If everything is installed correctly, you should be able to open a terminal and type adb, apktool, zipalign and apksigner commands without errors.
Get APK files from the device
A pop-up that appears after connecting the mobile device to your computer, with adb installed. If the pop-up doesn't appear, try typing adb in the terminal, or try using a different USB cable.
To modify the application files, we first need to get them onto our computer.
Enable USB Debugging on your mobile device.
To do that, go to Settings > Additional settings > Developer options > USB debugging (found in the Debugging section).
If you cannot find the "Developer options" button, you might need to enable Developer Mode by going into Settings > About device > Version and tapping on the Build number option seven times. You should get a message saying "You are now a developer!"
Connect your Android device to your computer using a USB cable. Choose "Android Auto" on your device if prompted.
On your mobile device, a pop-up should appear, asking for permission to allow USB debugging. Tap on allow; and if you plan on doing this often, you might want to tap the checkbox to always allow USB debugging from this computer. If the pop-up doesn't appear immediately, don't worry; it might appear after typing the command in the next step.
On your computer, open up a terminal and type:
adb shell
You should now have access to your mobile device on your computer via the terminal.
*hacking noises* we're in.
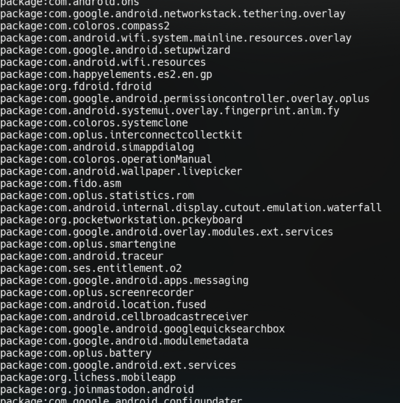
Now we need to find the package ID of the app that we are interested in. One way of doing that is finding the ID in the list of installed packages. In adb, type the following command to show the list of packages installed on the device:
pm list packages
On my device, this command shows 443 packages. Here is a few of them.
This command will only show the package IDs, so you cannot search by name. If you have a lot of applications installed, you might want to try piping the command to grep. grep is a command line utility that will filter down results by showing only the lines that have a specified string of text inside of them. For example the following command will show applications that contain the word "Pigeon" in their ID:
pm list packages | grep Pigeon
This time, only applications made by Pigeon Games will be shown.
Another way of getting the ID of an application, is just searching the app on the Google Play Store website. When you go to an application page on Google Play, the ID of the package will be embedded in the URL. For Rizline, the link is https://play.google.com/store/apps/details?id=com.PigeonGames.Rizline, and so the package ID is com.PigeonGames.Rizline.
The next step is to find the path of the APK files on the mobile device. Note that it is common for one application to have multiple APK files. Usually, there is one base.apk file, that is common for all devices, and several split APK files, that are device specific. For example, if your mobile device has a larger screen, it may download a split apk with extra high-quality assets.
To find the paths to the APK files, you can use the pm path <package_id> command. In our case, the command will be:
pm path com.PigeonGames.Rizline
Rizline has two APK files - a base.apk file and a split_config.arm64_v8a.apk file.
Now we know that the paths to our two APK files are:
/data/app/~~tMHzIziIkD3B_oH7sbOphw==/com.PigeonGames.Rizline-P6NKIGPvbzqSbdVySK53MQ==/base.apk, and
/data/app/~~tMHzIziIkD3B_oH7sbOphw==/com.PigeonGames.Rizline-P6NKIGPvbzqSbdVySK53MQ==/split_config.arm64_v8a.apk. We can use that information to download the files from the device to our computer.
Exit the adb shell:
exit
Create a new directory for our APK files. To do that, you can either create it using a GUI file explorer, or by typing the mkdir command. In my case, the directory name is rizline_mod
mkdir rizline_mod
Navigate to the new directory using the cd command.
cd rizline_mod
Now we can use the adb pull command to copy the files to the computer.
The adb pull command takes two arguments: the first one is the path on the mobile device, and the second one is the destination path, on your computer. In this case, we just name the resulting files base.apk and split_config.arm64_v8a.apk respectively.
In summary, here are all of the commands used to copy APK files from a mobile device to a computer
Decompile the APK files using apktool
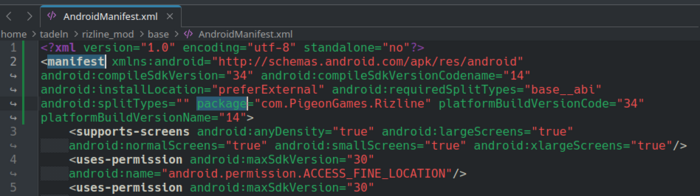
A screenshot of an AndroidManifest.xml file, when extracted from base.zip -- this doesn't look like an .xml file at all!
To modify the files of an APK package, we will first need to extract individual files from the downloaded APK files.
APK files are essentially just ZIP files in disguise. If you change the .apk file extension to .zip, you can open the file in any archiving software, just like a normal ZIP file. However, some files inside the APK file (such as AndroidManifest.xml) are in a weird, binary format. To read all of the files properly, we will use Apktool.
A screenshot of an AndroidManifest.xml file, when extracted using apktool -- this looks much more familiar!
Open a terminal in the directory with your copied APK files.
Type the following commands to decompile the APK files using Apktool:
apktool d base.apk
apktool d split_config.arm64_v8a.apk
This will create new directories - base and split_config.arm64_v8a with the contents of the APK files.
You can now explore the application files freely using a file manager.
Modify the application to allow user-installed certificates
Firstly, we will add a new file to our application. This file will allow the app to trust user-added certificate authorities. Create the file at base/res/xml/network_security_config.xml with the following contents:
base/res/xml/network_security_config.xml:
<network-security-config>
    <debug-overrides>
        <trust-anchors>
            <!-- Trust user added CAs while debuggable only -->
            <certificates src="user" />
        </trust-anchors>
    </debug-overrides>
</network-security-config>
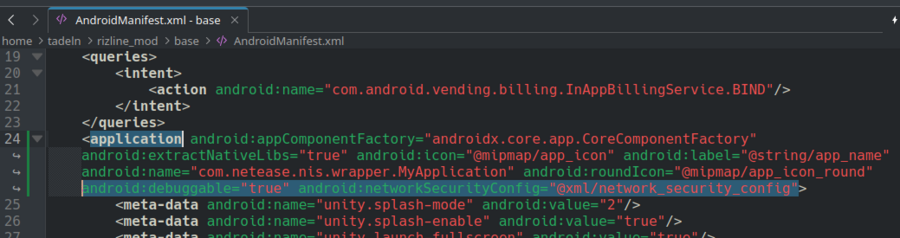
The next few changes we will make will occur in the AndroidManifest.xml file. Open base/AndroidManifest.xml with a text editor of your choice.
Find the <application> tag. It is located within the main <manifest> tag. We will insert two new attributes into this tag:
This will make the app "debuggable", and it will load the settings from the network_security_config.xml file we created before.
We added two new attributes: android:debuggable="true" and android:networkSecurityConfig="@xml/network_security_config" to the <application> tag.
Find an attribute named package="..." in the top-most <manifest> tag, and replace the contents of this attribute with your own app ID. In this example, we will replace com.PigeonGames.Rizline with rgwiki.rizline.example_mod. This change will allow us to have both the original, unmodified version of Rizline as well as our modified version at the same time.
We will change the com.PigeonGames.Rizline ID, to our own, made-up one: rgwiki.rizline.example_mod.
Find other instances of the original package ID and change them to our new package ID as well. In the case of Rizline, the com.PigeonGames.Rizline ID also appears later in the file, as part of another ID:
We need to replace this part of an ID with our new ID as well.
This varies from application to application. In this case, the app cannot be installed unless this other ID is changed to a new one. Other apps may have more IDs that you have to replace; and in some cases, you don't have to replace every ID with a new one, only some.
There is one more ID we have to change. Open the split_config.arm64_v8a/AndroidManifest.xml file. This file also has a package ID, and it should match with the package ID from the AndroidManifest.xml in the base directory.
This is the last ID we have to change in Rizline. In other apps, there may be more. Try to search the directory for the original ID and find them all!
The last change we will make, is a change of the application name, to differentiate between the two applications on the device more easily. Open base/res/values/strings.xml in a text editor. Find an entry that has the attribute: name="app_name", and modify the value to whatever you want. In this case we will change "Rizline" to "Rizline Modded".
We have modified all the files we need. Now we have to build the modified app and install it on our device.
Build and sign the modified APKs
Building the app from a directory of files is simple. Unfortunately, creating an APK file is not enough to install it to a device. To actually install the application, we will need to sign the APK files as well.
To build the APKs from files, we will use Apktool again. Open the terminal in the rizline_mod directory and type the following commands:
apktool b "base"
apktool b "split_config.arm64_v8a"
This will combine all of the files in the base directory into an APK file, and separately, combine all of the files in the split_config.arm64_v8a directory into a second APK file. Those new APK files are stored in base/dist/base.apk and split_config.arm64_v8a/dist/split_config.arm64_v8a.apk respectively.
This will create new files named base_signed.apk and split_config.arm64_v8a_signed.apk in the same directory as the original files.
Before signing the APK, we need to create a keystore. A keystore is a file that stores our key pair used to sign APKs. We only need to create a keystore file once, and then we can use it repeatedly. We will use keytool to create a new keystore. The command below will create a new keystore with the filename keystore.jks, and it will be valid for 99999 days.
After entering this comand, you will be asked to set a password. In this guide, we will simply use the word "password" as the password. Don't forget the password you set - you will need it later.
Then, you will be prompted to provide various pieces of information. You can skip all of the prompts by just pressing Enter - apart from the last one, where you have to type yes.
You can just skip most of the prompts, and type "yes" at the end.
Now it's time to sign the APK files. Use the commands below and type in the keystore password you set at the previous step to sign the APKs.
If there is no output, that means that we've done everything correctly! If there are some warnings, chances are you can probably ignore them. In the case of Rizline, there are some warnings, but everything still works. If there are errors, the app will likely not work.
These are the steps that you have to do every time you make a change to the app files. If you want to speed up the process of building in the future, you might want to consider creating a shell script to execute all of these commands for you.
All commands used to build and sign an APK file. In this example, we omitted the -v flag in zipalign to hide unnecesary output.
Install the modified APKs to the device
To install the files to your device, open the terminal and type the following command:


